First, the disclaimer. Character design does not belong to me. I've no idea if there even are rights for something like this, but if there are, I definitely don't own them. Not intended to infringe on anyone's copyright. Please, personal use only - I don't want to get into trouble for encouraging illicit merchandise!
Note that this is not a complete knitting pattern. I used a commercial pattern for the basis of the doll, and I have no right to distribute it. So you'll need to find your own pattern for a knitted doll approx. 10" tall (or just scale my extra bits up if your pattern is a different size, it wouldn't be very hard).
The pattern I used was "Jean Greenhowe's Mascot Dolls" ISBN 1-873193-10-6. I don't think it's still in print, but there are currently 14 on ebay.co.uk, so it's widely available (and also has US and Australian versions of the terms used). But that's just what I had to hand and isn't too complicated. Everything's stocking stitch, and uses DK wool and 3mm needles (or just use whatever your pattern uses).
The basic doll body and head are almost exactly as per pattern. You need to figure out how high up the legs you want the boots to come (I used 2/3 of the length not including the feet) and change colour then. If you're good at this, I guess you could put the pointy shape on the top of the boot legs, but this is beyond me. If you figure it out, please let me know! Similarly for the collar - I changed colour right after the shoulder shaping rows, and changed again to the head colour for the row where you add stitches for the head.
I did add a bit of extra height - the original dolls are very short. I put an extra 2 rows in the legs and another 2 in the body. This also gives a bit of leeway to make Tiny shorter...
Arms are again shaped exactly as the pattern (but 2 rows longer). The original dolls have bare hands and sleeves, and increase the number of stitches where the colour changes for the sleeve. I thought this was wrong for a glove, so I did the increase where I thought the junction between hand and arm came. Again you need to figure out where to change colour - this is 1/3 of the length of the arm, not including the hand. But remember to include the rows at the top of the arm where you're shaping it in the total length you calculate.
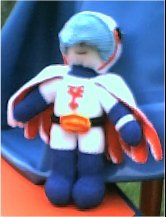
The bird emblem on the chest is embroidered on in chain stitch (with a few longer stitches added where it looked wrong) - I just copied it off the DVD cover.
Helmet - now this is where it gets a bit complicated. You need to figure out how many stitches you need to make the front edge. For my pattern, it's 50. (I measured how many stitches I had to an inch on the doll's body, and measured round the face between where I thought the corners of the helmet should come). Cast on this many stitches and knit enough rows to get pretty much to the back of the head (mine was 21).
Now you need to decrease 10 stitches each knit row. With 50 stitches, this means going (K3, K2tog) to the end, giving 40 stitches. Purl one row. Now do (K2, K2tog) to the end, giving 30 stitches, purl one row, and so on until you have 10 stitches left. Don't do the purl row, instead do what my pattern calls "B and T tightly". This just means cut off the wool with a few inches spare, thread it onto a darning needle, thread the needle back through all the stitches, pull it up tight and fasten off.
If you didn't use 50 stitches, you might need to modify where you start in the sequence of decreasing rows. Say you have 58 - that's nearly 60, so you'd start (K4, K2tog) and so on, and end up with 8 stitches left. The significant bit is that the total number of stitches you repeat over is 1/10th of the total, and you need to round up.
Put the helmet on the doll. Ignore your small child asking why Mark has a bonnet :-) Figure out how much of the seam at the back you need to sew up (obviously it needs a gap to go either side of his neck) take it off again and do it.
You can't see it, but my doll actually does have a bit of hair (you can usually see some under their helmets). I just cut a few lengths of brown wool (longer than the hair would actually be), laid them across his forehead and oversewed up the parting high up on the head (under where the helmet will go). Then put the helmet back on, tuck the ends of the hair well under until the amount visible looks right, and sew the helmet on round the front edge.
The coloured markings are embroidered on in chain stitch, copying the DVD covers again. And I learnt something new - Jason obviously has a spare helmet :-) About half the time his markings are identical to Mark's, the rest of the time it's more like two overlapping triangles. I spent a happy half hour confirming this with the episodes. The "eye" bits are a 10mm gold sequin, a 5mm green sequin, and a green seed bead. But you could embroider.
Now add the face (the pattern you have will describe how to do this, I'm sure).
The antenna was a four strand Scoubidou made in white wool. Thanks, Holly, I'd never have had the patience! (If you don't know what Scoubidou is, ask a ten year old - it's last month's playground craze). Attach to the back of the helmet where the two embroidered patterns point (not at the centre point of the knitting - it looks much too low). Or, if this isn't for a child, you could use something like a pipecleaner.
Visor. Anyone know of a source of transparent wool? Again you need to figure out how many stitches you need - what you cast on is the edge which goes against the helmet. I did 39 - i.e. 11 less than the helmet. It does need to be an odd number. Do more rather than less, or you end up with the visor tight against the face which just looks wrong.
Ist row: Knit 5, K2tog, knit to last 7 stitches. Slip one, knit one, pass slipped stitch over (Or just K2tog again, it doesn't look quite so good but the shape's the same). Knit 5. Purl one row.
Next row exactly the same, but knit 4 at the start, knit to last 6. Purl one row. Keep doing this, reducing the no. of stitches at each end, until the first thing you do is K2tog.
Do a couple more ordinary rows (depends how long you want the visor to be). Now figure out which is the middle stitch. Knit up to 1 before it, then slip 1 stitch, K2tog, pass the slipped stitch over. Purl one row. Repeat until you have 7 stitches left (Remember that the middle stitch will be different each row!). If you feel that the visor's getting too long, you can reduce the no. of rows required by also doing K2tog for the first two and last two stitches of each row.
When you have 7 stitches left, do one row where you increase into the second stitch and the sixth one (knit into the front and back of the same stitch), while also reducing in the middle 3 stitches as before. So you still have 7 stitches at the end. This makes the point of the visor turn over and point down.
Keep going as before, when you only have 1 stitch left break off the wool and thread it through and pull tight.
Sew the back edge of the visor to the front edge of the helmet.
Wings. Not nearly as difficult as you might think. You need to make 2 identical pieces, one for the top and one the lining. Cast on 36 stitches, there's then a pattern of 6 rows which you keep repeating.
You repeat this to make 6 of the long bits (I have no idea what they're called) on each side, so you actually do it 11 times altogether (the first and last are a bit narrower). After the 6th long bit cast off 20 stitches instead of 12, then cast on 20 again, to separate the wings a bit more. If this seems to make no sense, start anyway. By the time you've repeated the pattern a couple of times, you'll see what's happening.
I also found this made the neck a bit tight, so I did the pattern exactly as above 3 times, then for the next 4 times (2 each side of the centre) I knitted right to the end on row 5 instead of turning 5 stitches from the end. This would depend on what your doll looks like - once you've done about 3 long bits, hold it up to the doll (it's going to be sewn on level with the bottom of the collar) and see what it looks like. If the neck end looks like it won't be long enough, start knitting to the end on row 5. But note when you started, because you have to keep it symmetrical and also do the same again for the lining. It will depend very much on how far round the front you want the wings to come.
Once you've got the 2 identical pieces, put them back to back and sew round all the edges. I did this the right way out with the colour of the top surface, because I was worried that doing it inside out then turning right side out would make the edges very bulky.
Attach completed wings where the colour changes from body to collar.
Belt. Dead easy. Cast on a couple more stitches than your doll has round the middle, knit a couple of rows, cast off. Sew in place, with the join at the back.
Belt buckle. I know someone can do better than this... I just cast on 12 stitches, knitted 10 rows, then chain stitched the G onto the rectangle in the correct shape. As I attached it to the doll, I tucked the bits of the rectangle which were outside the G underneath.
Wristband. Cast on a couple more stitches than your doll's wrist has, knit a row, cast off. Sew in place. I added a square gold sequin held on with a black seed bead, but you could embroider it, especially if making for a little one.
I'll be honest - it is a bit complicated, especially the visor. If you're new to making knitted toys, I suggest you try something simpler first (a civvie version would avoid all the tricky bits and also involve a lot less knitting, while still using the same colours). Or you could just not do the visor, or make one out of something else (I did consider trying something with clear curved plastic from a Coke bottle, but I knew this one was going to get taken to bed so I went with the soft knitted version).
Good luck! I look forward to seeing the pictures! And please do let me know if you find a better way to do something!
Instructions © Catherine Rees-Lay, October 2005.